ConnectED provides additional Resources to enrich your professional development, classroom teaching, and learning assessment, as well as learning Resources for Students.
Marking Resources as Favorites make them easier to find and use when your ready to make an Assignment or build a Lesson Presentation.
Additionally, using My Files,you can add your own Resources to the ConnectED.
NOTE: Resources and access methods vary by program.
NOTE: Use the access method that matches your ConnectED program.
Access your ConnectED Resources from the Menu bar:
ConnectED displays the Resources page and default Search results (Figure 1).
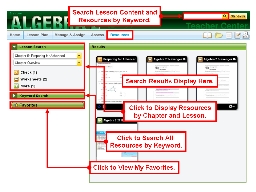
Figure 1. Menu Bar: Resources
OR
ConnectED displays the Resources page and default Browse results (Figure 2).
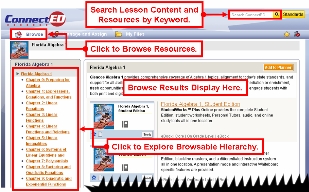
Figure 2. Menu Bar: Browse
ConnectED lets your Search and Browse your Lesson Content and Resource Library.
NOTE: Follow instructions that match your ConnectED program.
Some ConnectED programs allow you to search for Resources that are associated with specific Chapters and Lessons.
On the Menu bar:
In the Lesson Search box:
ConnectED displays the associate Resources and any available Filters (Figure 3).
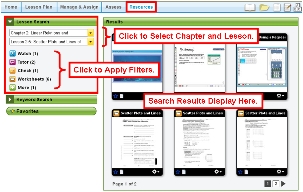
Figure 3. Lesson Search
Search for Resources using the Search box on the Banner or the Resources page (Figures 4 and 5).
ConnectED displays the Search results and any available Filters.
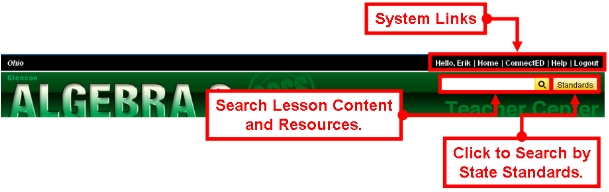
Figure 4. Search Box, Banner
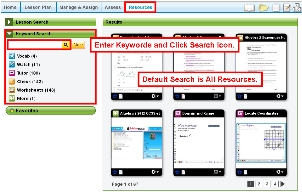
Figure 5. Keyword Search, Resources Page
Some ConnectED programs allow you to Browse Lesson Resources (Figure 6).
On the Menu bar:
ConnectED displays the Browse page. By default, ConnectED displays top-level of the hierarchy.
Figure 6. Browse Resources
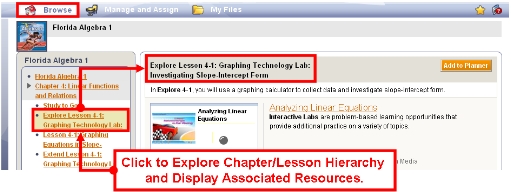
Figure 7. Browse Hierarchy
Some ConnectED programs allow you to use Filters (descriptors assigned to each Resource) to narrow your Lesson Search, Keyword Search, or Browse Search results into smaller results sets.
ConnectED displays available Filters along with your Search results.
Filters identify the type, and may include the number, of associated Resources.
NOTE: Follow instructions that match your ConnectED program.
ConnectED displays available Filters associated with your Lesson or Keyword Search (Figures 8–10).
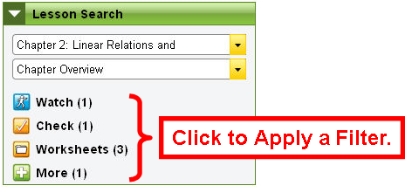
Figure 8. Lesson Search Filters
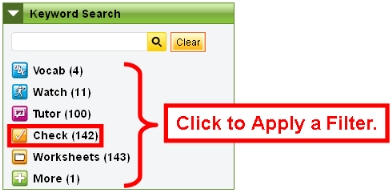
Figure 9. Keyword Search Filters
Some Filters may have subcategories (Figure 4).
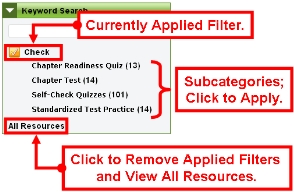
Figure 10. Keyword Search Filter with Subcategories
ConnectED displays matching Resources
ConnectED displays available Filters associated with your Browse Search (Figure 11).
NOTE: ConnectED displays only Filters associated with your specific Resource Library or Search results; thus, available Filters vary from search to search. At times, no Filters may be applicable.
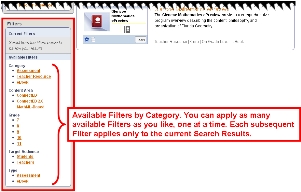
Figure 11. Browse Filters
ConnectED applies the selected Filter and displays (1) the new Browse Results, (2) the Current Filter, and (3) any remaining available Filters.
NOTE: Filters interact dynamically, and selecting one Filter may eliminate others because they no longer apply to the new Browse results.
ConnectED removes the selected Filter and displays (1) the resulting Browse Results, (2) the Current Filter(s), and (3) any remaining available Filters.

Figure 12. Remove Filter
ConnectED provides a thumbnail image of Resources (Figures 13 and 14).
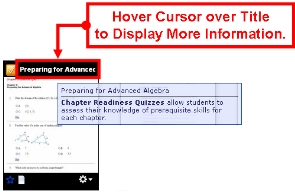
Figure 13. Thumbnail Image
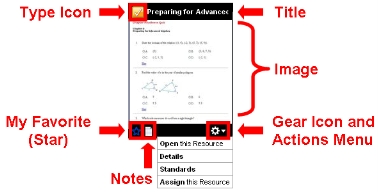
Figure 14. Thumbnail Key
NOTE: Available actions vary depending on Resource and ConnectED program.
| Table 1. Actions Menu | |
|---|---|
| Open this Resource | Open Resource in new window, or click image to open. |
| Details | View information about the Resource. May include Title, Type, Description, Grade(s), Teaching Level, Teaching Purpose, Publisher, Concepts, Standards. |
| Standards | State or Common Core Standards |
| Assign this Resource | Start the Assignment process; displays Make and Assignment page. |
| Email this Resource | Send Resource to email address in your Profile. |
You can mark, or "star," a Resource as a Favorite. Selected Resources appear immediately in My Favorites.
My Favorites are easy to find and use when you explore your Resource Library, edit a Lesson Section, or make Assignments.
Tip: Mark My Favorite Resources first, then edit a Lesson or Make an Assignment if those tasks involve Resources.
To add Favorite Status (star) to a Resource:
ConnectED displays thumbnail images of selected Resources (Figure 15).
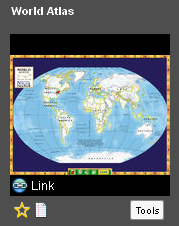
Figure 15. Thumbnail Image, Unstarred
ConnectED highlights the Star icon, and the Resource is immediately accessible in My Favorites (Figure 16).

Figure 16. Favorite Resource Indicated by Star
NOTE: Starred Resources appear in My Favorites and in All Resources (or any subset).
To remove Favorite Status (unstar) from a Resource:
OR
Click My Favorites to display all currently Starred Resources.
ConnectED displays thumbnail images of selected Resources.
ConnectED removes the highlighted Star icon, and the Resource is immediately removed from My Favorites.
NOTE: Use the access method that matches your ConnectED program.
OR

Figure 17. View Favorites
OR
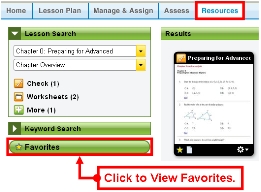
Figure 18. View Favorites
You can add your own Content to ConnectED to augment your Lesson Plans and instruction.
Allowable File types include a wide variety of common text, spreadsheet, program, image, audio, and video Files.
ConnectED stores your added Content in a special location, My Files, that you can access at any time.
To access My Files to add, view, edit, or delete a File:
On the Menu bar:
ConnectED displays My Files (Figure 19 and Table 2).
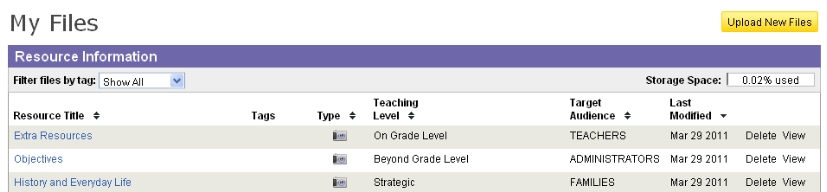
Figure 19. My Files
NOTE: Click on a column heading (e.g., Resource Title) to sort the Files by the selected attribute.
| Table 2. Key to Resource Information Page | |
|---|---|
| Resource Title | File name; click to add or edit Resource title, Tags, Description, Teaching Level, Target Audience |
| Tags | Self-selected keywords to help you identify the Resource |
| Type | Type of File; based on analysis of uploaded File |
| Teaching Level | Select from the following: English Language Learner, Approaching Grade Level, On Grade Level, Beyond Grade Level, Strategic |
| Target Audience | Select from the following: Students, Families, Teachers, Administrators, |
| Last Modification Date | The system date/time stamp when File was last modified. |
| Delete | Click to delete selected File. |
| Storage Space | Reported as a percentage of your total 250 MB storage space. |
You can add new Files up to the 250 MB storage limit.
To upload a File, on the My Files page:
ConnectED displays the File Upload dialogue box (Figure 20).
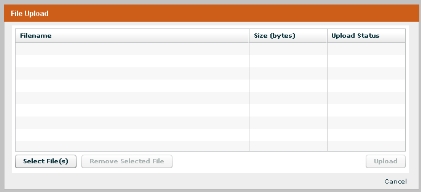
Figure 20. File Upload Dialogue Box
ConnectED interacts with you local computer to display your local Folder/File structure.
ConnectED populates the File Upload dialogue box with information about the selected File. Upload status is pending.
NOTE: Repeat steps 2 & 3 to add more Files. ConnectED displays a scroll bar when the number of Files exceeds the size of the dialogue box. To delete a File before uploading, select a File and click Remove Selected File. Click Cancel to abandon the action.
ConnectED uploads the File and displays a progress indicator.
When the File registration is complete, click Select More File(s) or Done.
By default, ConnectED assigns the following File attribute values (Table 2):
| Table 2. Default File Attribute Values | |
|---|---|
| Attribute | Value |
| Teaching Level | On Grade level |
| Target Audience | Teachers |
You can view Files that you upload to My Files.
To view a Resource:
NOTE: Click a column heading to sort the Files by the selected attribute (e.g., Resource Title).
ConnectED launches the needed application and displays the selected File in new window.
You can add or edit descriptive information about your Files after you upload them.
To add or edit information:
NOTE: Click a column heading to sort the Files by the selected attribute (e.g., Resource Title).
ConnectED displays the Edit [Resource Title] dialogue box (Figure 21 and Table 3).
Tip: ConnectED displays Files alphabetically by Resource Title.
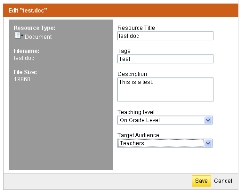
Figure 21. Edit File Dialogue Box
| Table 3. Editable Fields | |
| Resource Title | The default title is the File name. You can rename the File; ConnectED displays the first 42 characters of the Resource Title. |
| Tags | Enter your own Tags (File descriptors). |
| Description | Enter a description of the File. |
| Teaching Level | Default is On Grade Level. Select from English Language Learner, Approaching Grade Level, On Grade level, Beyond Grade Level, Strategic. |
| Target Audience | Default is Teachers. Select from Students, Families, Teachers, Administrators. |
NOTE: ConnectED retains and displays the Resource Type, original File Name, and File Size.
 How do I...? (Quick Links to Common Tasks)