You can make and manage Assignments for Students and track Student completion over time.
Tasks associated with Assignments include:
Your Assignments can include any combination of the following:
You can start making an Assignment from (1) the Manage and Assign page or (2) the Resource Library:
You can make an Assignment from the Manage and Assign page.
On the Menu bar:
ConnectED displays the Manage and Assign page (Figure 1).
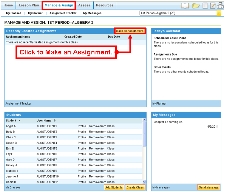
Figure 1. Manage and Assign Page
ConnectED displays the Make an Assignment page (Figure 2).

Figure 2. Make an Assignment Page
Complete the Make an Assignment page as follows:
You must name each Assignment.
NOTE: The Assignment Tracker lists and sorts Assignments by Name.
Tip: Use Assignment Names that will help you find and track Assignments over time.
You may add Instructions for your Students (optional).
Assignments pertain only to the selected Class and Students.
To select a Class:
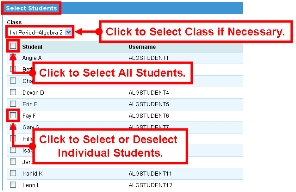
Figure 3. Select Class and Students
To select all Students:
To select individual Students:
NOTE: You must select at least one Student to receive the Assignment.
Choose the Dates for your Assignment.
Click the Calendar icon to select the following (Figure 4 and Table 1):
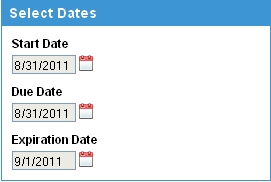
Figure 4. Assignment Dates
| Table 1. Assignment Dates | |
| Start Date | Date Assignment appears to Students; default is the current date. |
| Due Date | Assignment Due Date appears to Student; default is current date. |
| Expiration Date | Date Assignment is no longer accessible by Teachers or Students; default Expiration Date is the next day. |
You can assign selected Resources and Student Lesson Content.
In the Resources and Content panel:
ConnectED displays the Edit Resources and Content dialogue box (Figure 5).
NOTE: My Starred Resources displays by default.
Tip: Starring Resources before making Assignments makes it easy to find what you want.
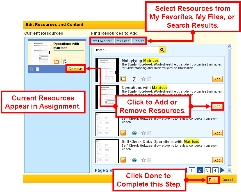
Figure 5. Edit Resources and Content Dialogue Box
You can browse or search for Resources or Lesson Content to add to your Assignment. Click the tabs at the top to view My Starred Resources (default), My Files, the Student Edition, or to search the Resource Library.
Some ConnectED programs allow you to assign Lessons from the Student Edition.
To assign a Lesson, from the Resource Library:
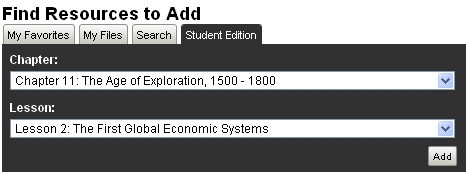
Figure 6. Add Student Edition Lesson to Assignment
When you have completed the Make an Assignment page (Figure 7):
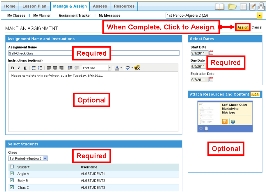
Figure 7. Sample Completed Make an Assignment Page
ConnectED displays the Assignment Assigned dialogue box (Figure 8).
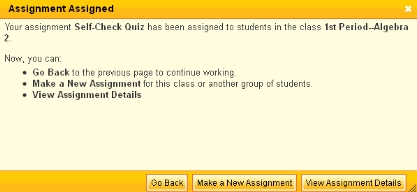
Figure 8. Assignment Assigned Dialogue Box
From here you can:
You can assign selected Resources from the Resource page (click link for full description of the Resource Library).
NOTE: You cannot assign Teacher Resources to Students.
From the Menu bar:
ConnectED displays the Make an Assignment page.
Follow the instructions for completing the Make an Assignment page.
You can edit, copy, or delete an Assignment at any time, starting from any of the following locations in ConnectED:
To display the Manage and Assign page, on the Menu bar:
ConnectED displays the Manage and Assign page.
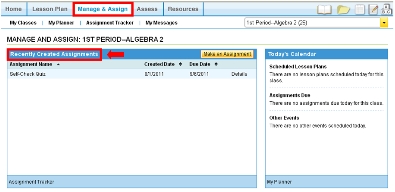
Figure 9. Manage and Assign Page: Recently Created Assignments Panel
ConnectED displays the Assignment Details page.
NOTE: You can edit an Assignment only if no Student has submitted the Assignment.
To edit an Assignment:
Networks displays the Edit an Assignment Dashboard (Figure 10).
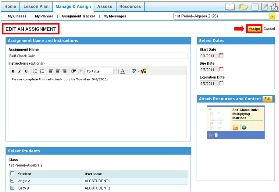
Figure 10. Edit an Assignment Dashboard
OR
Click Cancel to make no changes.
Networks displays the Assignment Details Dashboard.
You can copy an Assignment and use it as the basis for another Assignment, which you can assign to another Class or Student(s).
To copy an Assignment:
Networks displays the Copy an Assignment Dashboard (Figure 11).
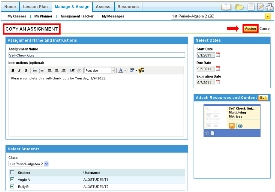
Figure 11. Copy an Assignment Dashboard
OR
Click Cancel to make no changes.
Networks displays the Assignment Details Dashboard.
NOTE: You can delete an Assignment only if no Student has submitted the Assignment.
To delete an Assignment:
Networks displays the Delete Assignment? message (Figure 12).
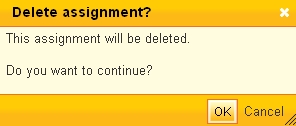
Figure 12. Delete Assignment Message
OR
Click Cancel to make no changes.
Networks displays the Assignment Details Dashboard.
On the Menu bar:
ConnectED displays the Assignment Tracker (Figure 13).
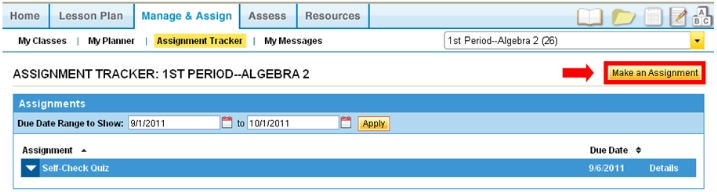
Figure 13. Assignment Tracker
ConnectED displays the Assignment Details page.
Click the desired action-- Edit, Copy, Delete--at the upper right.
NOTE: You can edit an Assignment only if no Student has submitted the Assignment.
To edit an Assignment:
Networks displays the Edit an Assignment page (Figure 14).
Figure 14. Edit an Assignment
OR
Click Cancel to make no changes.
Networks displays the Assignment Details page.
You can copy an Assignment and use it as the basis for another Assignment, which you can assign to another Class or Student(s).
To copy an Assignment:
Networks displays the Copy an Assignment page (Figure 15).
Figure 15. Copy an Assignment Page
OR
Click Cancel to make no changes.
Networks displays the Assignment Details page.
NOTE: You can delete an Assignment only if no Student has submitted the Assignment.
To delete an Assignment:
Networks displays the Delete Assignment? message (Figure 16).
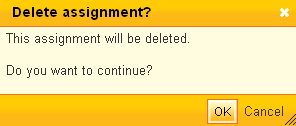
Figure 16. Delete Assignment Message
OR
Click Cancel to make no changes.
Networks displays the Assignment Details page.
After you make an Assignment, you can:
To view the Assignment Tracker, on the Menu bar:
ConnectED displays the Assignment Tracker (Figure 17).
Hover your mouse pointer over highlighted areas for more information.
![]()
Figure 17. Assignment Tracker
You can adjust how the Assignment Tracker presents information.
NOTE: The default Date Range is one month from the Current Date.
For each Assignment, you can track Student Assignment completion.
To track Assignment completion, from the Assignment Tracker:
ConnectED expands the Assignment Title (Figure 18) to show:
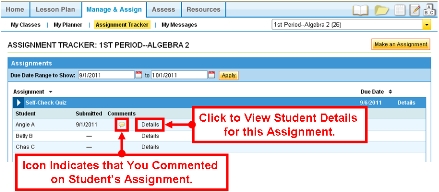
Figure 18. Assignment Details
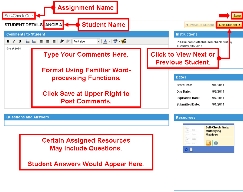
Figure 19. Student Details
On the Student Details page you can: